QEMU on WindowsでネイティブのRaspberry Pi OS (64-bit) を動かす

  • LINEで送る
起動しているスクショ

こんばんにちは

QEMUではホストとは異なるアーキテクチャのシステムをエミュレートすることができます.

そこで,Windows(x86_64)上にQEMUをインストールし,その上でaarch64(arm64)をエミュレートし,Raspberry Pi OSを動かしてみます.

続きをどうぞ

環境

Host

  • Windows 10 Pro ver.2004 build 19041
  • QEMU 5.1.0
  • WSL2
  • Ubuntu 20.04.1 LTS (Focal Fossa)

※ Ubuntuは .img の操作に使います.

Guest

  • Raspberry Pi OS GNU/Linux 10 (buster) arm64 lite

QEMU インストール

通常通りQEMUをインストールします.

ダウンロード

ダウンロードページより, qemu-w64-setup-20200814.exe をダウンロードします.

インストール

インストールするコンポーネントはデフォルトのまま.

インストール先はデフォルトの C:\Program Files\qemu としました.

確認

PS J:\raspi-buster> & 'C:\Program Files\qemu\qemu-img.exe' -V
qemu-img version 5.1.0 (v5.1.0-11824-g8699890d91-dirty)
Copyright (c) 2003-2020 Fabrice Bellard and the QEMU Project developers

必要ファイルの準備

OS イメージ

現時点でraspberrypi.orgダウンロードページからは32-bitのイメージしかダウンロードできません.

そこでミラーから探します.

RaspbianMirrors – Raspbian

今回はJAISTからダウンロードします.

Index of /pub/raspberrypi/raspios_lite_arm64/images/raspios_lite_arm64-2020-08-24

Ubuntu /mnt/m/DISK_IMAGE/Raspbian % wget http://ftp.jaist.ac.jp/pub/raspberrypi/raspios_lite_arm64/images/raspios_lite_arm64-2020-08-24/2020-08-20-raspios-buster-arm64-lite.zip
Ubuntu /mnt/m/DISK_IMAGE/Raspbian % unzip 2020-08-20-raspios-buster-arm64-lite.zip
Ubuntu /mnt/m/DISK_IMAGE/Raspbian % ll 2020-08-20-raspios-buster-arm64-lite.img
-rwxrwxrwx 1 k-san k-san 2000683008  8月 20 20:55 2020-08-20-raspios-buster-arm64-lite.img*

kernelとdtb

起動に必要なファイルをイメージから取り出します.

guestfish コマンドは libguestfs-tools パッケージに入ってます.

Ubuntu /mnt/j/qemu-raspi-buster % sudo guestfish --ro -a /mnt/m/DISK_IMAGE/Raspbian/2020-08-20-raspios-buster-arm64-lite.img

Welcome to guestfish, the guest filesystem shell for
editing virtual machine filesystems and disk images.

Type: ‘help’ for help on commands
      ‘man’ to read the manual
      ‘quit’ to quit the shell

> run
 100% ⟦▒▒▒▒▒▒▒▒▒▒▒▒▒▒▒▒▒▒▒▒▒▒▒▒▒▒▒▒▒▒▒▒▒▒▒▒▒▒▒▒▒▒▒▒▒▒▒▒▒▒▒▒▒▒▒▒▒▒▒▒▒▒▒▒▒▒▒▒▒▒▒▒▒▒▒▒▒▒▒▒▒⟧ --:--
> list-filesystems
/dev/sda1: vfat
/dev/sda2: ext4
> mount /dev/sda1 /
> copy-out /kernel8.img .
> copy-out /bcm2710-rpi-3-b-plus.dtb .
> quit

Ubuntu /mnt/j/qemu-raspi-buster % ll
合計 15152
-rwxrwxrwx 1 k-san k-san    28599 10月 16 11:54 bcm2710-rpi-3-b-plus.dtb*
-rwxrwxrwx 1 k-san k-san 15483392 10月 16 11:53 kernel8.img*

仮想ディスク

ダウンロードした .img ファイルからそのまま起動できるのですが,今回は別に仮想ディスクを用意します.

  1. raw から qcow2 に変換
  2. 仮想的なサイズを 16G にリサイズ(ディスク上のサイズは変化しません)
PS J:\qemu-raspi-buster> & 'C:\Program Files\qemu\qemu-img.exe' convert -f raw -O qcow2 M:\DISK_IMAGE\Raspbian\2020-08-20-raspios-buster-arm64-lite.img .\vdisk.qcow2
PS J:\qemu-raspi-buster> ls


    ディレクトリ: J:\qemu-raspi-buster


Mode                 LastWriteTime         Length Name
----                 -------------         ------ ----
-a----        2020/10/16     11:54          28599 bcm2710-rpi-3-b-plus.dtb
-a----        2020/10/16     11:53       15483392 kernel8.img
-a----        2020/10/16     13:09     1333854208 vdisk.qcow2


PS J:\qemu-raspi-buster> & 'C:\Program Files\qemu\qemu-img.exe' info .\vdisk.qcow2
image: .\vdisk.qcow2
file format: qcow2
virtual size: 1.86 GiB (2000683008 bytes)
disk size: 1.24 GiB
cluster_size: 65536
Format specific information:
    compat: 1.1
    compression type: zlib
    lazy refcounts: false
    refcount bits: 16
    corrupt: false
PS J:\qemu-raspi-buster> & 'C:\Program Files\qemu\qemu-img.exe' resize .\vdisk.qcow2 16G
Image resized.
PS J:\qemu-raspi-buster> & 'C:\Program Files\qemu\qemu-img.exe' info .\vdisk.qcow2
image: .\vdisk.qcow2
file format: qcow2
virtual size: 16 GiB (17179869184 bytes)
disk size: 1.24 GiB
cluster_size: 65536
Format specific information:
    compat: 1.1
    compression type: zlib
    lazy refcounts: false
    refcount bits: 16
    corrupt: false

ネットワーク準備

今回はホストにtapインターフェースを用意して,それに接続し,ホストにNATさせます.

TAP-Windows

ダウンロード

Windowsにtapデバイスを追加するのに, TAP-Windows というソフトウェアをインストールします.本来はOpenVPNのインストーラーに同梱されているようですが,単体でも問題なく使用できました.

TAP-Windows 9.24.2 – をダウンロード

現時点での最新が 9.24.2 2020/02/20 でした.

インストール

インストールするコンポーネントは TAP Virtual Ethernet Adapter のみで大丈夫です.

名前変更

環境によりますが, イーサネット 2 などの名称で TAP-Windows Adapter V9 のネットワークアダプターが追加されます.

指定しやすくするために イーサネット 2tap0 等の任意の名称に変更しておきます.

IPアドレス指定

tap0 のv4アドレスを設定します.

今回は 10.20.30.1/24 としました.

Nat 設定

管理者権限でPowershellを起動します.

  • -Name は任意です.
  • -InternalIPInterfaceAddressPrefixtap0 に割り当てたアドレスです.
PS C:\WINDOWS\system32> Get-NetNat
PS C:\WINDOWS\system32> New-NetNat -Name QemuNat -InternalIPInterfaceAddressPrefix 10.20.30.1/24


Name                             : QemuNat
ExternalIPInterfaceAddressPrefix :
InternalIPInterfaceAddressPrefix : 10.20.30.1/24
IcmpQueryTimeout                 : 30
TcpEstablishedConnectionTimeout  : 1800
TcpTransientConnectionTimeout    : 120
TcpFilteringBehavior             : AddressDependentFiltering
UdpFilteringBehavior             : AddressDependentFiltering
UdpIdleSessionTimeout            : 120
UdpInboundRefresh                : False
Store                            : Local
Active                           : True

起動

起動

以下のコマンドで起動します.

PS J:\qemu-raspi-buster> & 'C:\Program Files\qemu\qemu-system-aarch64.exe' -M raspi3 -append "console=ttyAMA0,115200 console=tty1 root=/dev/mmcblk0p2 rootfstype=ext4 elevator=deadline fsck.repair=yes rootwait" -dtb .\bcm2710-rpi-3-b-plus.dtb -drive file=.\vdisk.qcow2,format=qcow2,if=sd -m 1G -smp 4 -serial stdio -usb -device usb-kbd -device usb-net,netdev=net0 -netdev tap,id=net0,ifname=tap0  -kernel .\kernel8.img

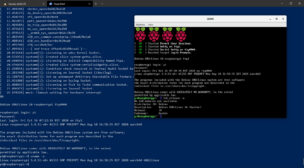
QEMUのウィンドウが出現し,ズラーッとテキストが流れ,ログインプロンプトが表示されます.

Debian GNU/Linux 10 raspberrypi ttyAMA0

raspberrypi login:

ログイン

通常通りログインします.

  • username: pi
  • password: raspberry
Debian GNU/Linux 10 raspberrypi ttyAMA0

raspberrypi login: pi
Password:
Last login: Thu Aug 20 13:03:55 BST 2020 on tty1
Linux raspberrypi 5.4.51-v8+ #1333 SMP PREEMPT Mon Aug 10 16:58:35 BST 2020 aarch64

The programs included with the Debian GNU/Linux system are free software;
the exact distribution terms for each program are described in the
individual files in /usr/share/doc/*/copyright.

Debian GNU/Linux comes with ABSOLUTELY NO WARRANTY, to the extent
permitted by applicable law.
pi@raspberrypi:~$

確認

Raspberry Pi OS といってもほぼDebianです.

pi@raspberrypi:~$ uname -a
Linux raspberrypi 5.4.51-v8+ #1333 SMP PREEMPT Mon Aug 10 16:58:35 BST 2020 aarch64 GNU/Linux
pi@raspberrypi:~$ lsb_release -a
No LSB modules are available.
Distributor ID: Debian
Description:    Debian GNU/Linux 10 (buster)
Release:        10
Codename:       buster
pi@raspberrypi:~$ getconf LONG_BIT
64

ファイルシステムリサイズ

通常ならば初回起動時にファイルシステムが自動的にリサイズされるようになっているのですが,起動時に指定していないのでリサイズさせます.

powershellからだと表示が崩れるので,QEMUのウィンドウで作業します.

pi@raspberrypi:~$ df -h /
Filesystem      Size  Used Avail Use% Mounted on
/dev/root       1.6G  1.3G  219M  86% /
pi@raspberrypi:~ $ sudo raspi-config

7 Advanced Options
  -> A1 Expand Filesystem

再起動します.

が,私の環境ではうまく再起動ができなくて, [ xxxx.xxxxxx] reboot: Restarting system で止まってしまうので,QEMUのウィンドウを閉じるかpowershellで Ctrl+c で終了させ,改めて起動します.

pi@raspberrypi:~$ df -h /
Filesystem      Size  Used Avail Use% Mounted on
/dev/root        16G  1.3G   14G   9% /

IPアドレス指定

通常通り指定します.

pi@raspberrypi:~$ EDITOR=vi sudo -e /etc/dhcpcd.conf
pi@raspberrypi:~$ tail -n4 /etc/dhcpcd.conf
interface eth0
static ip_address=10.20.30.10/24
static routers=10.20.30.1
static domain_name_servers=192.168.100.30

再起動なりして反映します.

pi@raspberrypi:~$ ip a s eth0
2: eth0: <BROADCAST,MULTICAST,UP,LOWER_UP> mtu 1500 qdisc pfifo_fast state UNKNOWN group default qlen 1000
    link/ether 40:54:00:12:34:57 brd ff:ff:ff:ff:ff:ff
    inet 10.20.30.10/24 brd 10.20.30.255 scope global noprefixroute eth0
       valid_lft forever preferred_lft forever
    inet6 fe80::fc11:381d:1a6f:f9b3/64 scope link
       valid_lft forever preferred_lft forever
pi@raspberrypi:~$ curl -I https://blog.k-san.info
HTTP/1.1 200 OK
Date: Fri, 16 Oct 2020 06:06:09 GMT
Server: Apache
Strict-Transport-Security: max-age=15768000
Link: <https://blog.k-san.info/wp-json/>; rel="https://api.w.org/"
Link: <https://wp.me/9vPHv>; rel=shortlink
Content-Type: text/html; charset=UTF-8

既知の未解決問題

パワーオフや再起動ができません.

reboot[ xxxx.xxxxxx] reboot: Restarting system で止まるし,
shutdown -h now は最後にカーネルパニックになります.

halt ならカーネルパニックは起きませんが,結局 Ctrl+c なりで終了させる必要があります.

オフ時はいいとしても,再起動が出来ないのが少し不便ですね...改善方法は現時点では不明です.

余談

デスクトップ環境

今回はliteを用いましたが,起動時のオプションに -device usb-mouse を追加してポインタデバイスを接続することで,デスクトップ環境も使えるようです.(未検証)

ネットワークのブリッジ接続

今回はホストにNATさせていますが, tap0 を任意のネットワークアダプターとブリッジ接続し,適切にIPアドレス等を設定すればホストと同じサブネットに接続できます.(未検証)

QEMU on Linux

今回はWindowsにインストールしたQEMUで起動していますが,QEMUが動けば何でも良いので,もちろんLinux上のQEMUでも同様のことが出来ます.

たとえば,WSL2にQEMUをインストールして,raspiosを起動できます.

Ubuntu /mnt/j/qemu-raspi-buster % /opt/qemu/qemu-5.1.0/bin/qemu-system-aarch64 -M raspi3 -append "console=ttyAMA0,115200 console=tty1 root=/dev/mmcblk0p2 rootfstype=ext4 elevator=deadline fsck.repair=yes rootwait" -dtb ./bcm2710-rpi-3-b-plus.dtb -drive file=./vdisk.qcow2,format=qcow2,if=sd -m 1G -smp 4 -serial stdio -kernel ./kernel8.img -display none

ネットワーク周りは環境に合わせて変更する必要があります.

QEMUのウィンドウ

起動時のオプションに -display none を追加すれば,ウィンドウが出てこなくなります.

参考サイト

  • LINEで送る

SNSでもご購読できます。

コメントを残す

*